Evidence-first Sub-Zero intake across Menlo Park Menlo Park & San Mateo County · Mon–Sat 7am–7pm · (650) 699-5567 · Book Online 4.9/5 on Google · 138 local reviews
Meridian ProsSub-Zero · Menlo Park

Model checklist · Menlo Park

Menlo Park Sub Zero Model Number Photo Checklist: evidence-first Sub-Zero guidance

Last updated: June 5, 2026

Before a Menlo Park Sub-Zero visit, the model and serial photo can determine whether the technician can stock the correct gasket, fan, valve, board or sealed-system part on the first trip. The model family points to tag location and part category; the serial confirms production changes. have the full label ready, not just a typed model, plus temperatures, cabinet photo and symptom close-up.

Phone photo of a Sub-Zero model and serial number label
A complete tag photo is the fastest way to stock the correct gasket, fan, valve, board or sensor before a Menlo Park visit.

What this usually means

The tag changes parts, access and the quote path

A built-in Sub-Zero refrigerator may look identical from the kitchen, but the model and serial number decide which gasket profile, fan motor, control board connector, valve, thermistor and ice maker assembly belongs inside. A model typed from memory can be enough to start a conversation, but it is not enough to stock parts confidently. A photo proves the series and serial at the same time, and it catches digits that are easy to transpose during an emergency.

In Menlo Park homes with multiple integrated columns, the photo also prevents the wrong appliance from being quoted. One warm fresh-food column beside a separate freezer column may share the same panel style but use a different model family. The first test is not removing panels; it is matching the symptom to the exact appliance.

Model family -> tag location -> part risk

Where to look by Sub-Zero family

Model familyCommon tag locationPhoto anglePart risk if missing
Classic / built-inBehind top grille or inside upper sidewallWide shot, then close-up labelWrong evaporator fan, gasket or control variant
Designer / integrated columnsInterior sidewall or door frame, often highUse phone light and keep panel openColumn-specific sensor, board or hinge/gasket risk
Legacy 600 / 700 seriesBehind grille, interior wall or old paperworkWipe dust and photograph serial clearlyDiscontinued or revised parts need serial proof
Wine storageInside cabinet frame, near zone or grilleInclude zone and display if driftingWrong zone sensor, fan or rack-access plan
Undercounter drawersDoor/drawer frame or interior sidePull drawer partly open and shoot straightDrawer slides, valve and control mismatch

Good photo checklist

How to take a usable model-tag photo

PhotoMust showWhy
Wide appliance photoFull built-in, doors/panels, surrounding cabinetShows access, panel style and whether a pull is likely
Full tag photoModel, serial, voltage line and production informationPrevents part mismatch and serial-digit errors
Close-up tag photoSharp model and serial numbersLets intake read the label without guessing
Symptom photoAlarm, frost, water, cube shape or thermometerLinks the model to the actual failure path
Temperature photoIndependent thermometer or display plus setpointSeparates display drift from real compartment temperature

What can be identified before visit

What the tag can and cannot decide

The model and serial number can identify likely gasket profile, fan motor family, ice maker assembly, water valve, control-board generation, sensor family and access expectations. It can also reveal whether the unit is old enough for repair-vs-replace planning if a major fault is confirmed. That is why the tag is so important for one-visit repair planning.

The tag cannot prove the failed part. A warm fresh-food section still needs vent readings, evaporator inspection and meter tests. A suspected sealed-system problem still needs airflow ruled out and proper pressure/leak evidence. The tag is the planning proof; the diagnosis is the repair proof.

A clear photo of the model/serial tag plus a wide cabinet shot and one close-up symptom photo lets a Menlo Park technician arrive with the serial-matched gasket, board or fan, avoiding a second visit to a hillside Sharon Heights or estate address where a return trip is costly. Sending those three images before dispatch is the single biggest factor in a confirmed first-visit Sub-Zero repair in Menlo Park.

Can identify before visitCannot identify before visit
Likely part family and availabilityWhich component has electrically failed
Gasket profile and door styleWhether a door is warped or just misaligned
Cabinet pull expectationsWhether the unit must actually be pulled
Repair-vs-replace contextFinal quote without diagnostic evidence

Local notes

Real Menlo Park photo problems

In older Allied Arts and Felton Gables homes, labels can be dusty, faded or partly hidden by trim from an earlier remodel. In Stanford Hills and Sharon Heights kitchens, integrated columns may be installed so flush that the owner assumes the tag is unreachable, when it is actually behind the grille or inside the upper sidewall. Use a phone flashlight, shoot straight at the label, and include a wide photo first. If the tag is truly unreadable, have ready the original invoice, appliance paperwork or a photo of any installer label.

When not to guess

Do not let a partial model number create a false quote

A partial model can make two units look the same when their serial ranges use different parts. Do not approve a gasket, board or compressor path from a partial label or a generic appliance description. If the photo is blurry, retake it. If the label is inaccessible, say so and have paperwork ready. The goal is to avoid the expensive version of "almost the right part."

Photo steps

How to photograph a Sub-Zero model and serial tag

  1. Take a wide appliance photo. Show the built-in, cabinet trim and surrounding access.
  2. Find the label. Check behind the grille, upper interior sidewall, door frame or paperwork.
  3. Photograph the full label. Capture model, serial and production information in focus.
  4. Add symptom evidence. Include temperatures, alarm, frost, water or cube-pattern photos.

Model checklist FAQ

Model and serial photo questions

What model photo should I have ready before dispatch?

Have a wide appliance view ready, a full tag photo and a close-up of the model and serial numbers. Include the symptom photo and current temperatures in the same message. The full label matters because serial ranges can change fan, gasket, board, valve and sensor variants even within the same model family.

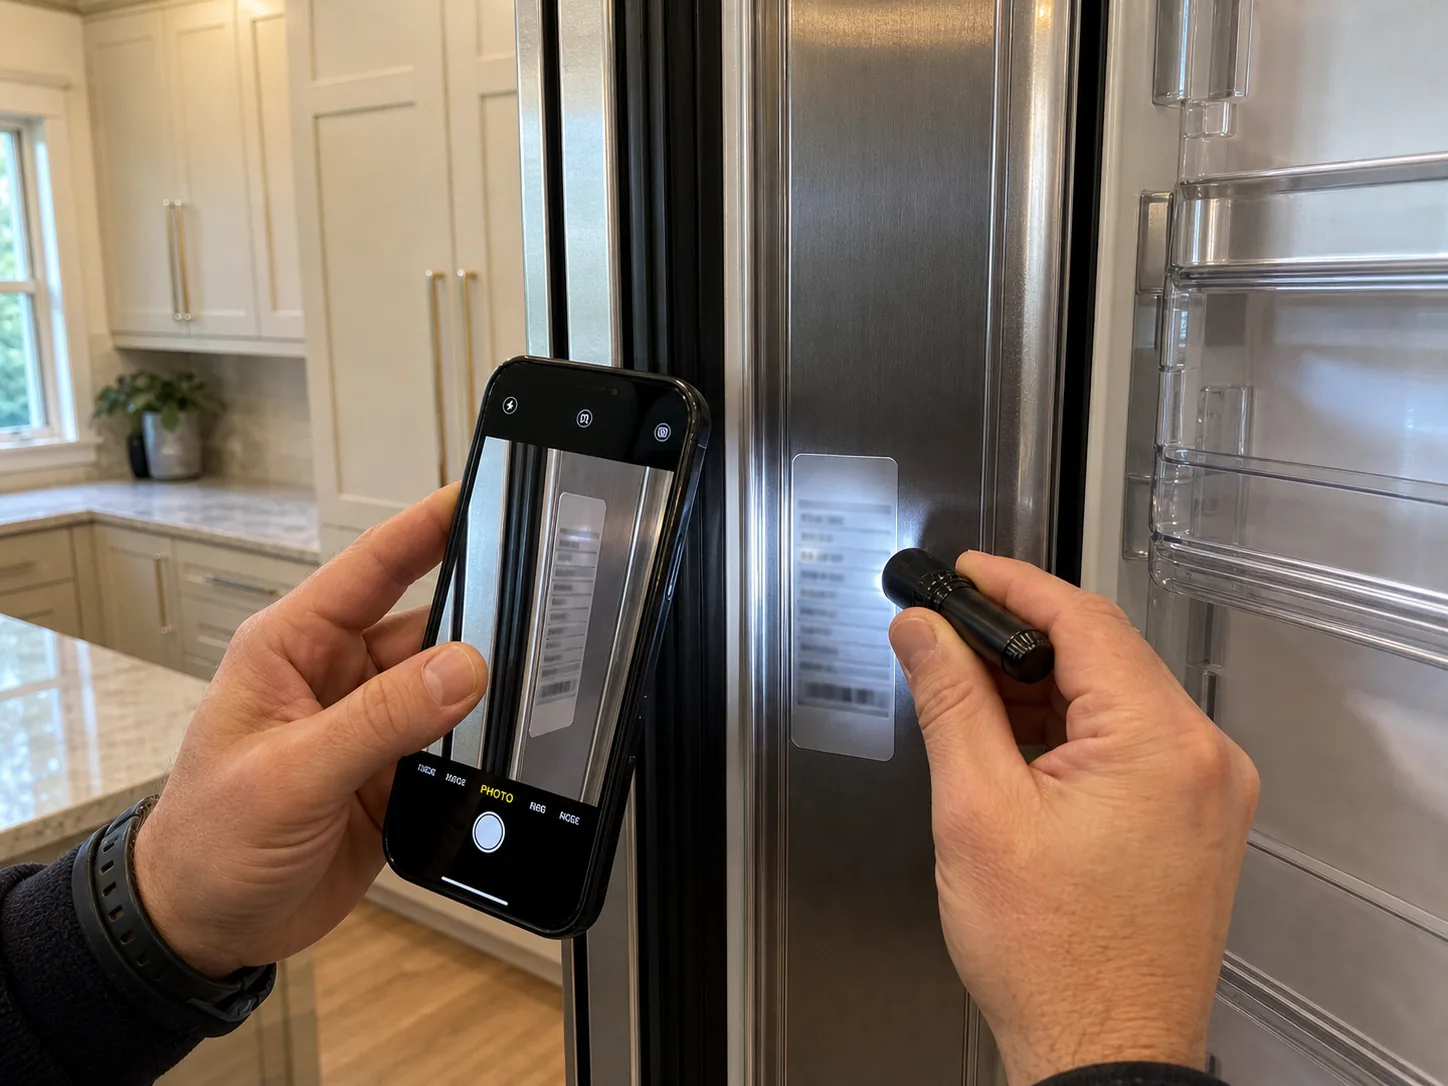
Where is the model and serial number on a built-in Sub-Zero?

Common locations are behind the top grille, on an upper interior sidewall, inside the door frame or in the original paperwork. Designer columns and wine units can place labels higher or inside the frame. Use a phone light and take both a wide photo and a close-up so the context is clear.

Is a typed model number enough?

A typed model number can start intake, but a photo is better for dispatch. Typed digits are easy to transpose, and the serial number is often missing. The serial can decide production changes and part compatibility, so a clear photo reduces second-visit risk and protects the quote from assumptions.

What if the label is faded or unreachable?

have the best photo ready you can, then have original appliance paperwork ready, an installer invoice or any service history that lists the model and serial. If the label is truly unreadable, say that during intake so the technician can plan verification on site before parts are opened.

Can the tag prove whether the compressor failed?

No. The tag can identify the compressor family and whether parts may be available, but it does not prove failure. A sealed-system or compressor diagnosis still requires airflow checks, electrical tests and pressure/leak evidence where appropriate. The tag plans the visit; testing confirms the repair.

Why does the wide cabinet photo matter?

The wide cabinet photo shows whether the built-in is flush, panel-ready, blocked by trim, close to delicate flooring or likely to need a protected pull. It helps plan time and tools before dispatch. The model tag tells the appliance story, but the cabinet photo tells the access story.

Do I need to empty the refrigerator to photograph the tag?

Usually no. Most tag locations are behind the grille, on a sidewall or inside the door frame, so a quick phone-light photo is enough. If food or bottles block the label, move only what is needed and keep the door open as briefly as possible to preserve temperature evidence.

Next step: have evidence ready before the visit

Before booking, Have a wide appliance view ready, full model/serial tag, close-up tag, current temperatures and one symptom photo. Those five images usually decide what parts and access plan should be prepared.

Local reviews

Recent Menlo Park Sub-Zero service reviews

Local feedback on model-first diagnosis, clean built-in work and written pricing.

4.9/5 Google rating
138 local reviews
★★★★★

“I texted the behind-grille model/serial tag for our BI-36 plus a wide cabinet shot and a close-up of the warm fresh-food vent. For our Belle Haven townhouse the technician arrived with the serial-matched evaporator fan already on the truck and fixed it first visit, same-day, with no second trip.”

George T.Belle Haven · Sub-Zero service customer
★★★★★

“The sidewall tag photo on our 700TR column, plus a symptom close-up of the frosted evaporator, let the technician match the serial to the right control sensor before dispatch. At our Central Menlo Park estate the part came on the truck and the repair was done first visit for about $420, with no second visit.”

Carmen P.Central Menlo Park · Sub-Zero service customer
★★★★★

“For our 424 wine unit I sent the in-frame model tag, a wide shot of the custom panels and a close-up of the drifting zone display. In our older Allied Arts home the technician brought the serial-matched zone sensor and door gasket, planned the panel pull, and finished first visit with no second trip.”